


Image created by ChatGPT
Affiliate Disclosure:
In compliance with the Federal Trade Commission (FTC) guidelines, I want to make you aware that some of the links on this blog are affiliate links.
This means that if you click on a link and make a purchase, I may receive a small commission at no additional cost to you.
Thank you for your support!
– Achlab
Key Takeaways
- 1. Structural Integrity transfers the deck's weight into the home's framing.
- 2. Water Management Flashing is the "unsung hero" for deck longevity.
- 3. Prevent Corrosion with Metal Compatibility
Introduction
Have you ever looked at a construction detail and wondered how this works? You see the lines and labels, and somehow it translates into a physical model. I have learned to better understand construction details; you have to learn the layers and sequence. What is the process from one side of the wall to the outside? Today I am going break down a typical ledger detail. Commonly used in deck building. You would not need this detail if you are doing a freestanding deck that is not attached to a house. When the ledger is attached to the house, it transfers the weight into the home's framing.
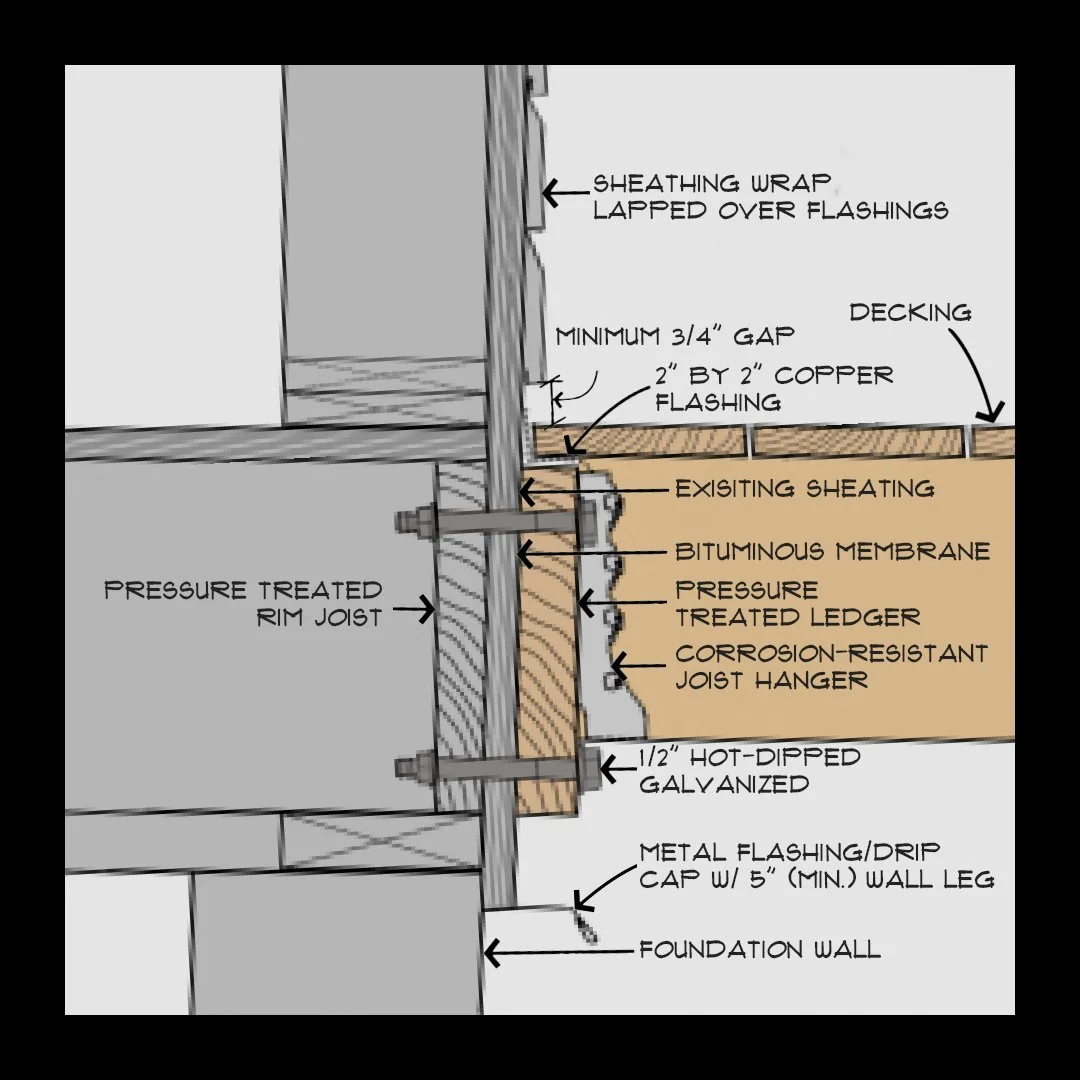
The ledger deck detail represents the critical moment where architecture meets building science. As you can see in my rendered sketch, every layer has a purpose: structure, separation, and protection. Let’s break down the anatomy of this connection and see why each component matters.
The Purpose of a Ledger
The ledger board serves one purpose: to create a secure and structural connection between the deck and the house. It is the transfer point where gravity loads from the deck joists move into the home’s framing. Without it, the deck would require its own independent support system, such as a freestanding platform. When properly detailed, the ledger allows the deck to feel like an extension of the home, not an attachment. It carries weight, resists lateral movement, and, when flashed correctly, keeps water out of the wall assembly.
Created by Anne Harris
1. Structure Meets Envelope
Upon closer examination, the connection begins with a foundation wall and a pressure-treated rim joist, forming the solid backbone that supports the deck. The pressure-treated ledger board is bolted into the structure using ½-inch hot-dipped galvanized bolts. It is essential to use galvanized hardware that is resistant to corrosion. The ledger safely transfers vertical loads from the deck joists into the home. A corrosion-resistant joist hanger then supports each deck joist, completing the load path.
2. The Role of Flashing
Flashing is the unsung hero of deck longevity. You will be surprised how many deck builders may overlook this or even abandon this step. In the detail, I am calling out for a 2-inch by 2-inch copper flashing to be placed over the ledger. The purpose of this flashing is to direct water away from the house. Above that, the sheathing wrap laps over the flashing, ensuring any rainwater drains outward rather than seeping behind the assembly. A layer of bituminous membrane adds an additional waterproof shield, separating the wood from the sheathing and protecting against rot. Installed in the right sequence, these layers create a continuous drainage plane that allows the building envelope to “breathe.”
3. Air Gaps and Moisture Control
Next, a minimum ¾-inch gap is maintained between the deck boards and the house cladding. Double-check your local code because this gap may be tighter. Though small, this gap is essential because it allows trapped moisture to evaporate and keeps air circulating behind the ledger. If this separation was not provided, water can wick into the framing, leading to hidden wood rot decay. When paired with pressure-treated materials, this small detail extends the lifespan of both the deck and the home’s siding.
4. Metal Compatibility
Have you heard of this mnemonic: “Stop Calling Me A Carless Zebera But Rather How Copper Saves Gold”? Here is the secret code! Stop is Steel, Calling is Cadmium, Me is Magnesium, A is Aluminum, Careless is Carbon Steel, Zebra is Zinc, Rather is Red Brass, How is Hastelloy, Copper is Copper, Save is Silver, Gold is Gold. From the start, it is considered anodic (more likely to corrode), as you move toward the end, it is considered cathodic (noble, corrosion-resistant. It important to understand this concept. When two metals from different parts of the series are in contact (say, aluminum and copper), the more anodic metal will corrode in the presence of an electrolyte (like moisture). So basically, the deck hardware must withstand both moisture and the chemicals in treated lumber. Choosing galvanized or stainless-steel fasteners prevents galvanic reactions that cause rust streaks and deterioration. Even one untreated screw can compromise the entire connection over time.
Conclusion: Sequence and Craftsmanship
There is a method to madness; a well-built deck ledger follows a logical order: foundation, membrane, ledger, flashing, sheathing wrap, joists, decking. Each step builds upon the last, protecting against structural failure and water intrusion. Skipping even one layer can lead to leaks that go unnoticed until they become costly to repair.
Recommended Resources

Simpson Strong-Tie Deck
Deck Connector: The 14 gauge DTT2 fastens easily to the wide face of a single or double 2x using included 1-1/2 inch Strong-Drive SDS Heavy-Duty Connector screw
Shop on Amazon →
GRK Structural Screws (RSS Series)
Ideal for structural wood to wood fastening, For interior/exterior use, Integrated Washer Head provides maximum clamping force and Star Drive Recess for zero stripping Shop on Amazon →

Weather-Resistant Deck Joist Butyl Tape
Joist tape for decking, with each roll measuring 6 inches wide and 50 feet long. With a total length of 100 feet
Shop on Amazon →
DEWALT 20V/12V MAX Laser Level Kit
Accurate readings within 1/8 in. at 30 ft. to achieve plum lines Power output<1mW Laser Class II.
Shop on Amazon →
Disclosure:
This article is for general informational purposes only and does not constitute legal, architectural, or construction advice. Reading this post does not create an attorney–client or professional relationship. Contract language and regulations may vary by state and project type. Homeowners should consult a licensed architect or qualified construction attorney before signing any agreement or beginning work.
– Achlab
About the Author

Anne Harris
Join the Achlab Newsletter
Get weekly insights on architecture, design law, and lifestyle — delivered straight to your inbox.
Subscribe NowBook a Consultation
Ready to bring your project to life? Get tailored guidance on home design, permitting, or construction strategy with Achlab.
- Perfect for early-stage scopes & homeowner questions